There are many materials can be used to D.I.Y a light tent. For me, I used ABS pipe as the main frame. It is more rigid and lighter than uPVC pipe. It is easy to form shapes that I want. The most important factor is that it can be easily dismantled and reassembled for carriage and storage.
So, my D.I.Y. light tent’s main design criteria would be easy carriage, storage and washable.
Pic 1 - draft design.I started off with a design sketched on a piece of paper as above.
Pic 2 - Materials.
The materials used were:
a) 1/2” diameter ABS pipes 630mm x 2 nos, 540mm x 2 nos, 485mm x 3 nos & 480mm x 1 no.
b) 1/2” diameter ABS elbows 6 nos.
c) 1/2” diameter ABS tees 2 nos.
d) 1/2” diameter ABS end caps - nos.
e) 1/4” diameter uPVC pipes 1120mm x 2 nos.
f) Steel studs 4 nos.
g) Polythene cloth (white) 1120mm x 630mm
h) Superglue 50ml
i) White string 1 roll
j) Steel rods 630mm x 2 nos
k) Aluminium rivets x 4 nos
l) Copper connector pins x 2 nos
The tools and equipment used were:
a) Sewing needle 1 piece
b) Pipe cutter 1 no.
c) Scissor 1 pair
d) Measuring tape / ruler 1 piece
e) Marker pen (black) 1 no.
First of all, cut the ABS pipe into the required lengths using the pipe cutter. Dry joint them together as the main frame in accordance to the design.
Pic 3 - Main FrameNext, cut a piece of white polythene cloth of size 1120mm x 630mm and sewed the longitude edges to allow a 1/4” uPVC pipe to slot through. The other edges also need to be sewed for proper termination. Cut 2 pieces of 1/4” uPVC pipes in a length of 1120mm each. Use Superglue to glue a steel stud on both ends of the uPVC pipes.
Pic 4 - 1/4" uPVC pipe, both end with steel studs.

Drill 2 holes at interval along the 1/4" uPVC pipe to receive steel bracing rods. Steel bracing made of steel rods with both ends capped with aluminium rivet.
Pic 5 - Steel bracing rods to form arched shape tent.

Pic 6 - Steel bracing rod fixed to 1/4" uPVC pipe.

Pic 6 - Sewed white cloth reinforced with 1/4" uPVC pipe & steel bracing rods.

Make a hole on ABS elbows and tees of the main frame to receive these steel studs. Slot the 1/4” uPVC pipe into the longitude edges of the white cloth. Fix both steel studs into the hole on ABS elbows and tees of the main frame to form an arched shape white tent.
Pic 7 - Make a hole on Elbows & Tees.
Pic 8 - Fix the arched shape tent into the hole on tees.
Pic 9 - Fix the arched shape tent into the hole on elbows.
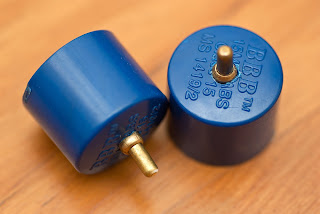
To hold seamless background sheets, I used a 1/2" ABS pipe with both ends capped with an end cap with a hole on it, in which a copper connector pin was glued to it.
Pic 10 - End cap and copper connector pin.Pic 11 - Drill a hole through end caps and fix the copper connector pins.
Pic 12 - fix end caps to both ends of the ABS pipe as a background sheet roller.

Then drill a hole on both vertical 1/2” diameter ABS pipes to hang this background sheet roller. BUT be careful not to punch through the ABS pipe! You can also drill few holes on top for other rolls of a difference color background sheets.
Pic 13 - Drill holes on vertical hanger pipes to receive background sheet rollers.
Pic 14 - Background sheet roller fixed to vertical hanger.
Pic 15 - Details.
Pic 16 - The Main Frame with the background sheet roller.
Fix the arched shape white tent to the Main Frame.
Pic 17 - D.I.Y. arched shape light tent.
Here you go! This arched shape light tent is ready for some test shots. But before that, I need a lighting system. You can go for an external flash system or a continuous lighting system.
I bought a pair of fluorescent studio lights from ShaShinKi.com - Malaysia's Online Camera Shop!. It has an output of 45W + 45W, with a light temperature of 5100k to 5500k.
Pic 18 - Fluorescent Studio Light System

Now, It's time for the real test shots!
Pic 19 - Lion King
Manual exposure 1/50, f8, ISO 200, WB 5100k, handheld.
Pic 20 -Torch Led LightManual exposure 1/60, f8, ISO 200, WB 5100k, handheld.


No comments:
Post a Comment